[ad_1]
With the Blink smart cameras, you can set up a security system in your home at a very affordable price. The best thing about the Blink camera is that its setup is fairly straightforward and can be accomplished entirely at home. However, elevating the security of your home has never been easier.
You can trust us with everything from unpacking the box to completing the settings on your app. This will surely help you if you are someone who is looking forward to securing your home with the Blink outdoor camera. So, let’s check out the steps to install your Blink Outdoor camera easily.
How to Install Your Blink Outdoor Camera
You can easily configure a Blink outdoor camera. Here’s how to do it. It won’t take long before your camera system is up and running. However, before you go ahead with the first step, make sure you do the following:
- You must have a mobile device.
- Take your Blink outdoor camera pack with you.
- Accessible via a reliable WiFi network.
1. Download the Blink App
Once you are ready, you must download the Blink app on your smartphone and move to the next step.
2. Create an Account
After you have downloaded Blink, you can use it. The first thing you need to do is create a Blink account. Fortunately, this process is straightforward and quick.
3. Link your Amazon Account
Your Amazon account is not required to be linked to your Blink. In case you want to easily manage your Blink subscriptions. If this is the case, then you will benefit from the linking process. You don’t have to worry. Camera installation can be completed in this step in the shortest amount of time.
- To link accounts, click on Link Accounts.
- Create an Amazon account or sign in.
After that, you’ll be able to link the two accounts. You may do this later if you wish. On your screen, tap the Skip option to do so. 
4. Prepare your items
Once your app is set up and you have created an account. The camera will be easily connected to your device. Make sure you prepare your items so they can be easily retrieved when needed. It’s time for you to take your Blink outdoor camera out of its box if you haven’t already. Please ensure that the following items are included:
- There is a Sync Module.
- Some AA batteries.
- Your Blink camera or cameras.
- Connector and adapter for the sync module.
You can proceed by removing any films or covers they may have.
5. Set up your sync module
For those of you who are wondering what the sync module does. Your Blink camera’s controller relays commands to it. However, despite its smaller size, it still has a lot of power.
To access your camera’s data, you need this powerful device on your phone. Nevertheless, even though it’s in charge of the complicated stuff. There’s no need to worry. You can set it up in no time at all. To begin, you must add the sync module to your system.
- On your mobile device, open the Blink app.
- Right-click your screen and tap the plus (+) button.
- Make sure the Blink wireless camera system is selected from the list of devices.
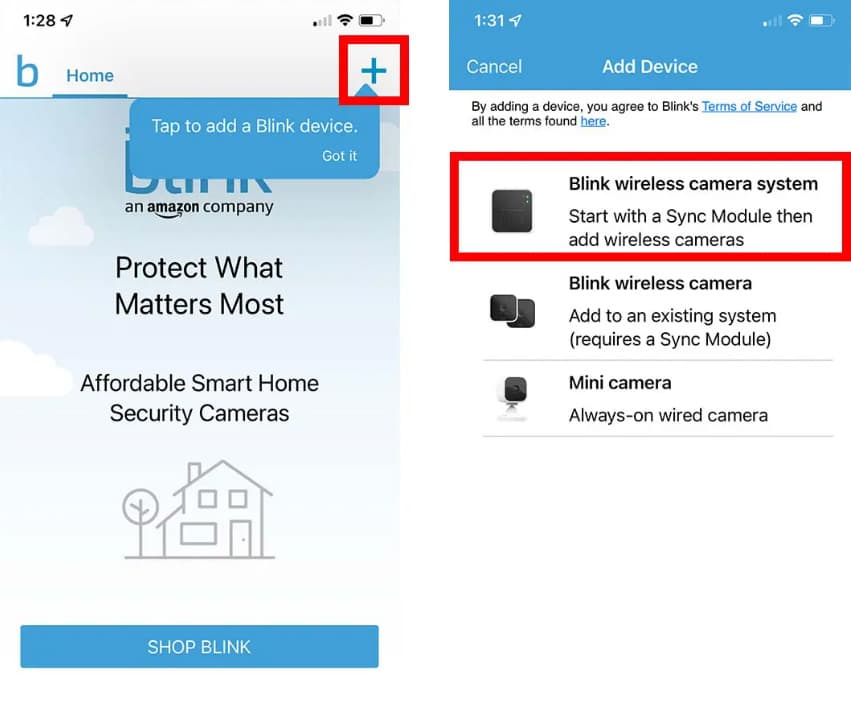
- Thereafter, it will pop up a window that asks for camera access. Then tap OK.
- After that, enter the serial number of the Sync Module manually or using a QR code.
6. Connect it To WiFi
Once your QR code has been input:
- You will need to name your new system and confirm it.
- Make sure your sync module is plugged into an outlet. To get started, simply follow these steps:
- To connect the adapter to your box, insert the power cord.
- Your sync module should be connected to the cord’s other end.
- If you want to use your WiFi router, find an outlet nearby.
- You will need to plug the adapter into the outlet.
As soon as you’ve plugged in your module, you’re ready to go. You will see the signal light pattern on your module once it appears. Here’s the pattern you need:
-
- Lights blinking in blue.
- Lights that are steady green.
- To discover the device, click Discover Device after you see the pattern.
Note: If you cannot see it, you might have to reset your sync module.
- When a window pops up, click Join.

- A list of nearby 2.4 GHz WiFi networks will be displayed.
- Simply tap the WiFi name to connect. You will be asked to enter a password and click Join.
- Click Done to finish.
After you click this, you will be redirected back to your Blink app’s home screen. You should now see the name of your system at the top of your screen.
In addition, you can see the status of your sync module. It is important that the line between the cloud and the symbol of the module is green. In this case, your module and your device are communicating effectively.
7. Insert batteries into your Blink camera
In the case of a brand-new Blink outdoor camera. If that’s the case, the box will already include batteries that are suitable.
- Size AA.
- Made of Lithium.
- Non-rechargeable.
Warning: Avoid using rechargeable Lithium-Ion (Li-ion) batteries. You may experience problems with your Blink camera if you use them.
You can insert them into your camera by following these steps:
- If your device is connected to a mount or accessory, remove it.
- Your camera’s silicon disk covering the screw needs to be removed.
- Open the camera using the tool provided in the box. To loosen the screw, turn it counterclockwise.
- Using your fingers, gently pry off the cover. To remove the cover, lean the camera slightly to one side.
- You will need to insert non-rechargeable batteries.
8. Add Your Blink Outdoor Camera to Your Blink System
On your mobile device, open the Blink app. Then, follow these steps to connect your camera:
- On your screen, click the plus (+) button.
- Choose a Blink wireless camera.
- You can scan the QR code between the batteries on your camera.
- Once your camera has been recognized, you will see the onboarding screen.
9. Return the back cover of your camera
Once you’ve added your camera, you’re ready to go. If you would like to prepare for setting it up, you can close it again. In order to return the back cover of your camera, follow these steps:
- Using the guide notches, align the back cover with your camera.
- Glue the back cover to the front.
- Turn the screw clockwise once it’s in place.
- It needs to be turned around three times to be tight enough.
Note: Be careful not to overtighten the screw, as it will cause external damage.
10. Position your camera
There’s only one thing left to do now: position your camera. As far as this step is concerned, there are no rules. To assist you in placing your camera better, here are some suggestions:
- When shooting in busy areas, keep your camera away from the traffic.
- It should be placed within 100 feet of the sync module.
- Keep your camera away from the sun.
ALSO READ:
[ad_2]
Source link