[ad_1]

A perfect profile picture is a priority in social networks and instant messaging apps. While most social networking sites automatically crop your images to fit as a profile picture display, what if you want to crop a picture into a circle for a different purpose?
You may want to crop a picture into a circle for various reasons. First, a circled image usually looks appealing and can draw the viewer’s attention.
You may even want to crop a picture into a circle before sharing it to give it an aesthetic appeal. Whatever the reason, it’s pretty easy to crop a picture into a circle on Windows.
How to Crop a Picture into a Circle on a PC
Hence, if you want to crop a picture into a circle on Windows, continue reading the guide. Below, we have shared some easy methods. Let’s get started.
1. Crop a Picture into a Circle in Word
Since we all have a Microsoft Office suite application installed on our device, we can use it to crop a picture into a circle. Here’s how to crop a picture into a circle in Word.
1. Open a Microsoft Word document and click Pictures.
2. Insert the image you want to crop into a circle.
3. Next, select the ‘Crop‘ function at the top-right corner and select ‘Crop to Shape‘

4. Now, you will see all available sets of shapes. Select the Circle available under the Basic shapes.

5. This will immediately crop your image into a circle. You can drag the corners to adjust the size of the image.

That’s it! That’s how easy it is to crop a picture into a circle in Word.
2. Crop a Picture into a Circle using Photoscape
PhotoScape is one of the best and most lightweight photo editing tools available for PC. You can use it to crop a picture into a circle on Windows. To do so, follow some of the simple steps we have shared below.
1. First, download & install the PhotoScape application on your computer.
2. Once installed, open the PhotoScape application and click on the Editor.

3. Select the image you want to crop into a circle.
4. Next, switch to the Crop tool.

5. On the Crop, check the Crop Round Image option.

6. Now, draw the area on the picture you want to crop into a circle.

7. After making the changes, click the Crop button.

8. Once done, save the cropped image on your computer.

That’s it! This is how you can crop an image into a circle using PhotoScape. The tool is absolutely free to use, and it has many features for photo editing.
3. Crop a Picture into a Circle in Photoshop
Photoshop may not be for everyone because it’s complicated to use, but it does have every photo editing feature & tool you may need.
On PhotoShop, you can easily crop a picture into a circle. Here’s how to do it.
1. Open the PhotoShop application on your computer and insert the image you want to crop.
2. Now select the Elliptical Marque Tool at the right menu bar.
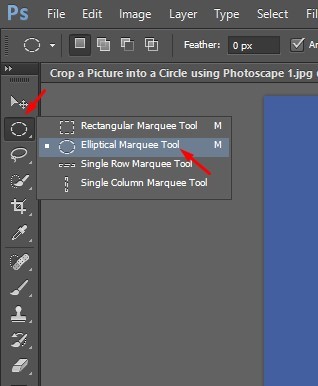
3. Draw the portion using the Elliptical Marque tool on the image you want to crop.

4. Once done, click the Add a mask button at the bottom right corner.

5. Next, select the new layer mask you’ve just created.

6. Once selected, click on the Image tool and select ‘Crop‘
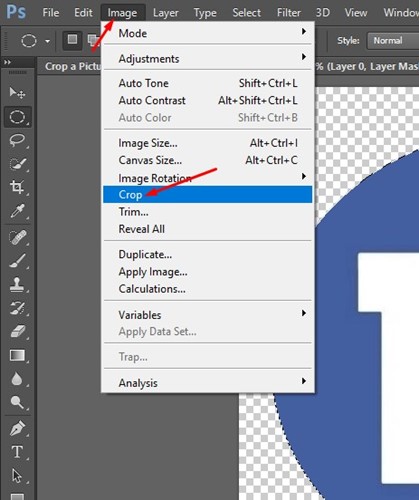
7. This will crop the picture into a circle.
8. To save the cropped image, click on File > Save As.

That’s it! This is how you can crop a picture into a circle using Adobe Photoshop.
4. Crop a Picture into a Circle using Fotor Photo Editor
Fotor Photo Editor is a free web tool for editing images. It has free and premium plans, but the photo crop feature is available on the free version. Here’s how to crop a picture into a circle using Fotor Photo Editor.
1. Open your favorite web browser and visit the fotor.com website.
2. When the site opens, click the Open Image button and select the picture you want to crop.

3. Expand the Crop tool at the left and select ‘Circle‘.
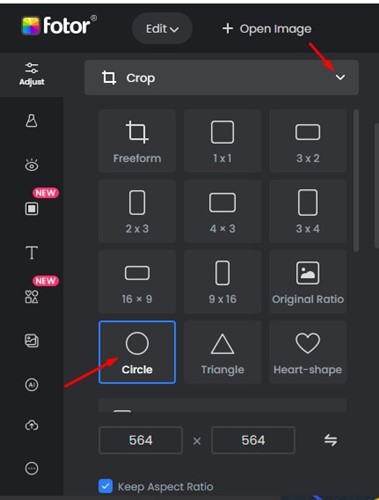
4. Now select the portion of the image you want to crop.
5. Click the ‘Apply‘ button to crop the picture.

6. Once the picture is cropped into a circle, click the ‘Download‘ button at the top to download it on your computer.

That’s it! That’s how easy it is to crop a picture into a circle using Fotor Photo Editor.
5. Crop a Photo Into a Circle using Adobe Online Editor
You can use the Adobe Express online editor to crop your pictures into a circle. Follow the steps we have shared below to crop photos into a circle online.
1. Launch your favorite web browser and visit this website.
2. When the site opens, click on Upload your photo button.

3. On the Media, click on Upload from device button and select the photo you want to crop.
4. Once uploaded, click on the Crop tool.

5. Select a Circle on the Shapes.
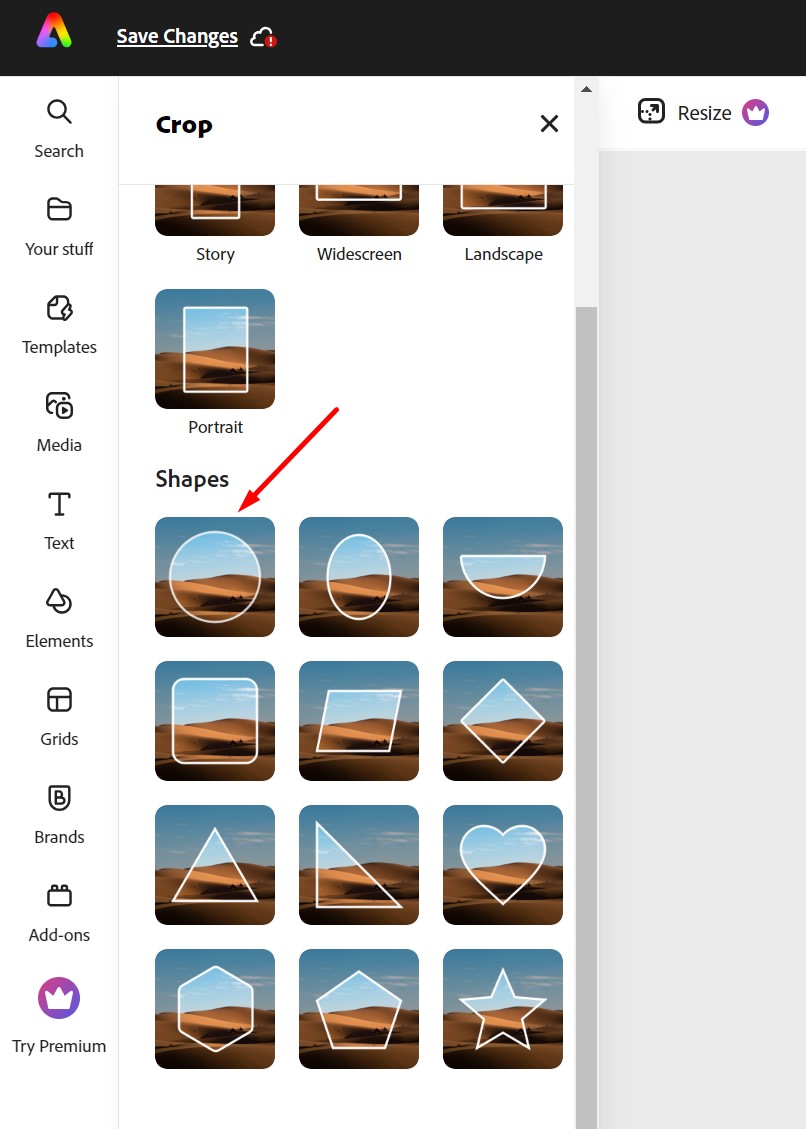
6. This will immediately crop your photo into a circle. Once cropped, click on the Download button at the top of the screen.

That’s it! This is how you can crop your photos into a circle using the Adobe Express online editor.
Also Read: How to Put Two Pictures Side by Side On Windows
So, these are the few best ways to crop a picture into a circle on PC. The Fotor photo editor method will work even if you use a Mac, Android, or iPhone because it runs on a web browser. If you need more help cropping a picture into a circle, let us know in the comments. Also, if the article helped you, make sure to share it with your friends.
[ad_2]
Source link
