[ad_1]
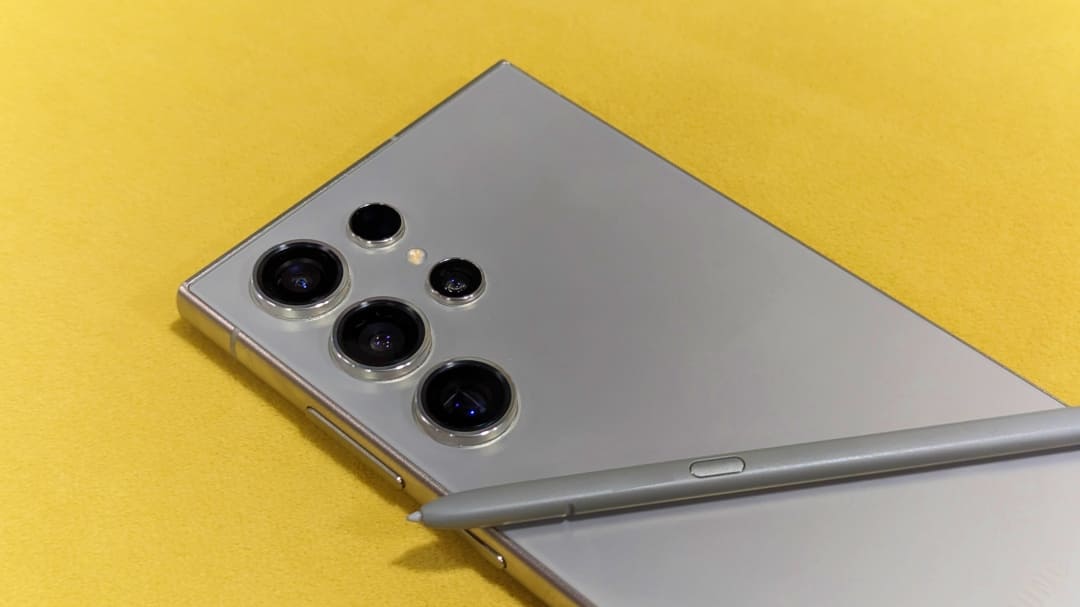
Do you ever find yourself flipping through old photos, wishing they were crisper, clearer, and more vibrant? Enter the Samsung Galaxy S24 Ultra – it’s not just a phone camera. It’s a photography powerhouse armed with a 200-megapixel sensor and AI wizardry that transforms ordinary shots into extraordinary memories. Plus, with features like dual recording, instant slow-motion, auto framing, and S-Pen, the possibilities are endless. Are you feeling overwhelmed already? Here are the best Samsung Galaxy S24 Ultra camera tips, tricks, and hidden features you need to know.
1. Capture Photos in 200-Megapixel Resolution

Samsung Galaxy S24 Ultra boasts a 200-megapixel primary camera. By default, it produces 12-megapixel photos through a process called pixel binning. It combines multiple pixels into one ‘superpixel,’ which allows the camera to capture more light and produce brighter, clearer photos, especially in low-light conditions.
In situations with ample light, such as under direct sunlight, you can use the 200-megapixel mode to capture more details than the ones in a regular shot.
To capture full-resolution photos on your Galaxy S24 Ultra, open the Camera app and tap the resolution icon (12M) at the top. Then, change it to 200M.
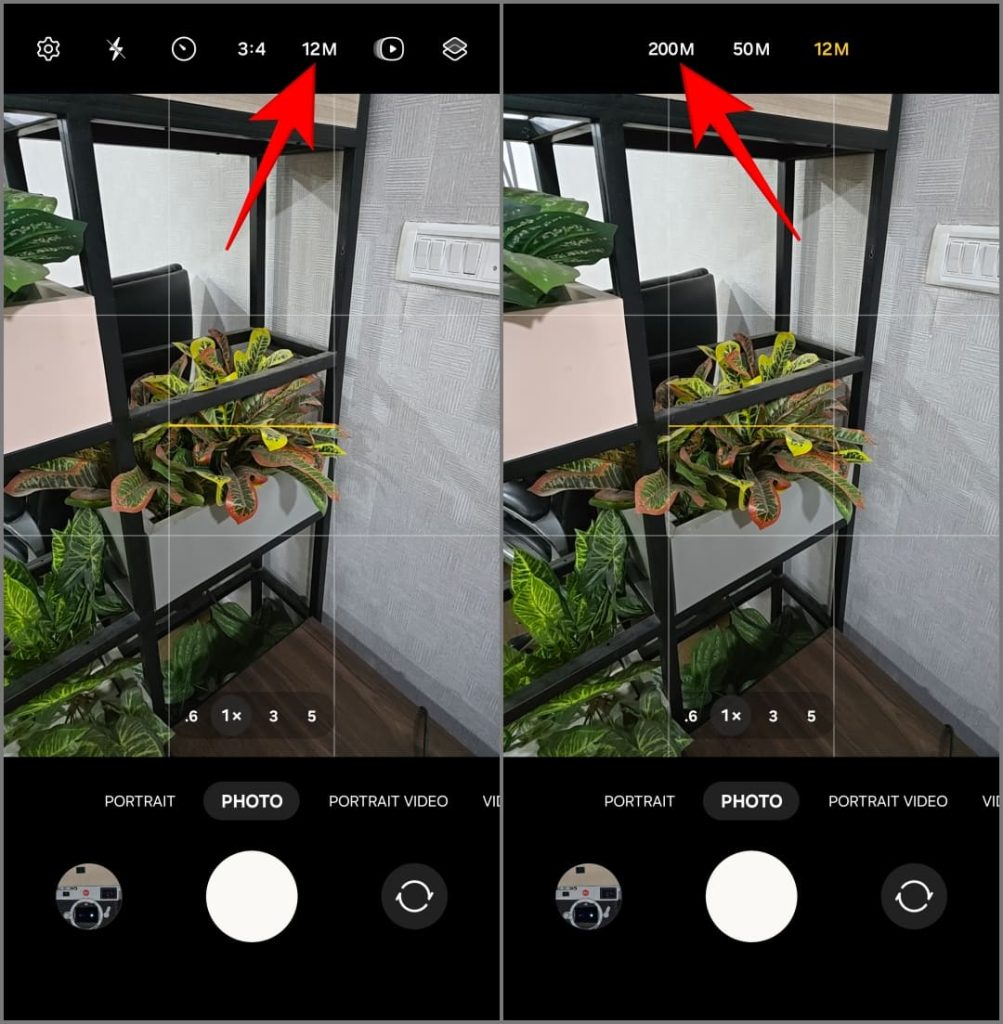
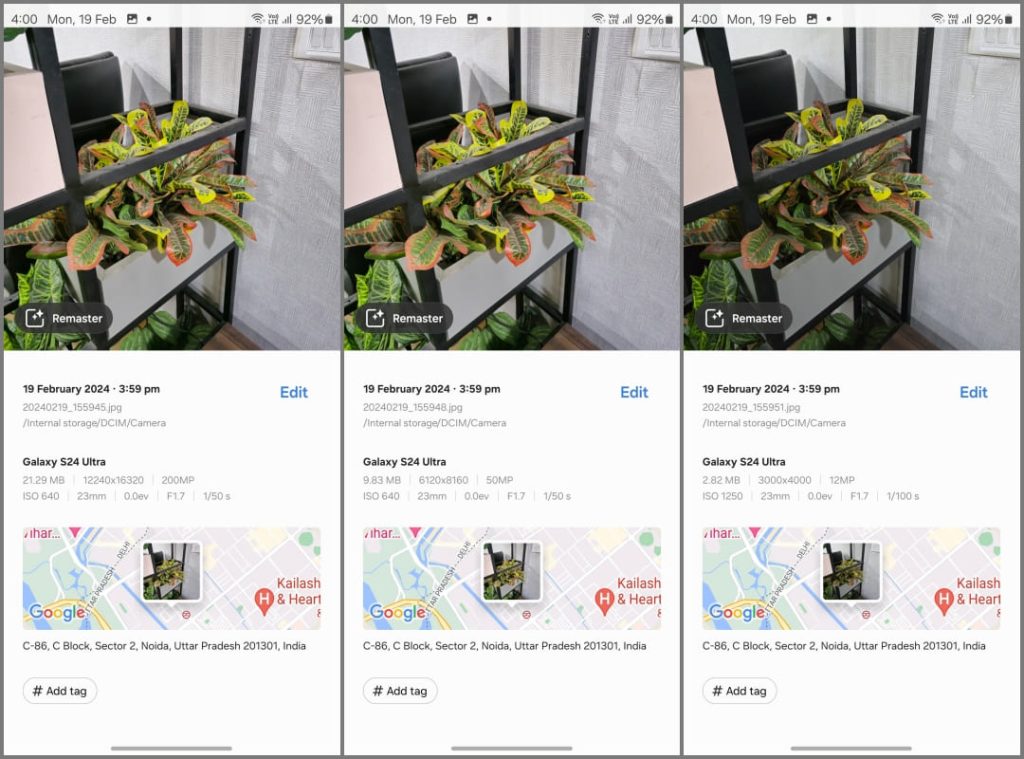
Keep in mind that images captured in 200-megapixel resolution occupy more space and may appear noisy in low light. Alternatively, you can opt for the 50-megapixel mode, which offers a good middle ground between storage consumption and clarity.
When to Use the 200-Megapixel Mode:
- Capturing extreme detail: Ideal for capturing landscapes or monuments in bright daylight where you want to have as much detail as possible. It also allows you to crop in heavily without losing quality.
- Taking photos for prints or wallpaper: Regular photos may appear pixelated or blurry when used as desktop wallpaper or printed in a large format, such as a poster or banner. Use the 200-megapixel mode for better sharpness and clarity on larger canvases.
When Not to Use the 200-Megapixel Mode:
- Capturing in low light: The 12-megapixel mode uses pixel-binning for brighter and clearer low-light photos.
- You’re low on storage: The 200-megapixel photos are massive in size and can fill your storage quickly. On the S24 Ultra, a single 200MP photo can take up roughly 5 times more storage than a 12-megapixel photo, while a 50-megapixel photo occupies about double the space.
- Short on time: Full-resolution photos take longer to process, cause significant shutter lag, and don’t support burst shots.
In short, stick with 12-megapixel for everyday clicks. Use 200-megapixel for bright landscapes, detail-oriented subjects, or when you want to crop later.
To avoid overexposure in 200-megapixel mode, especially in bright scenes, tap the area with the most highlights to manually lock the exposure. Additionally, turn off Adaptive Pixel in Camera Assistant when shooting in full resolution. This will enhance output, but you’ll need plenty of light for good results.
2. Turn On High-Efficiency Photo and Video
While the Galaxy S24 Ultra offers up to 1TB of storage (depending on the variant), photos and videos can quickly eat into that space. To save storage, consider enabling high-efficiency modes for both, which use modern HEIC and HEVC codecs to get photos in smaller file sizes without sacrificing image quality. Here’s how:
1. Open the Camera app on your Galaxy S24 Ultra. Go to Settings.
2. Go to Advanced Picture Options.
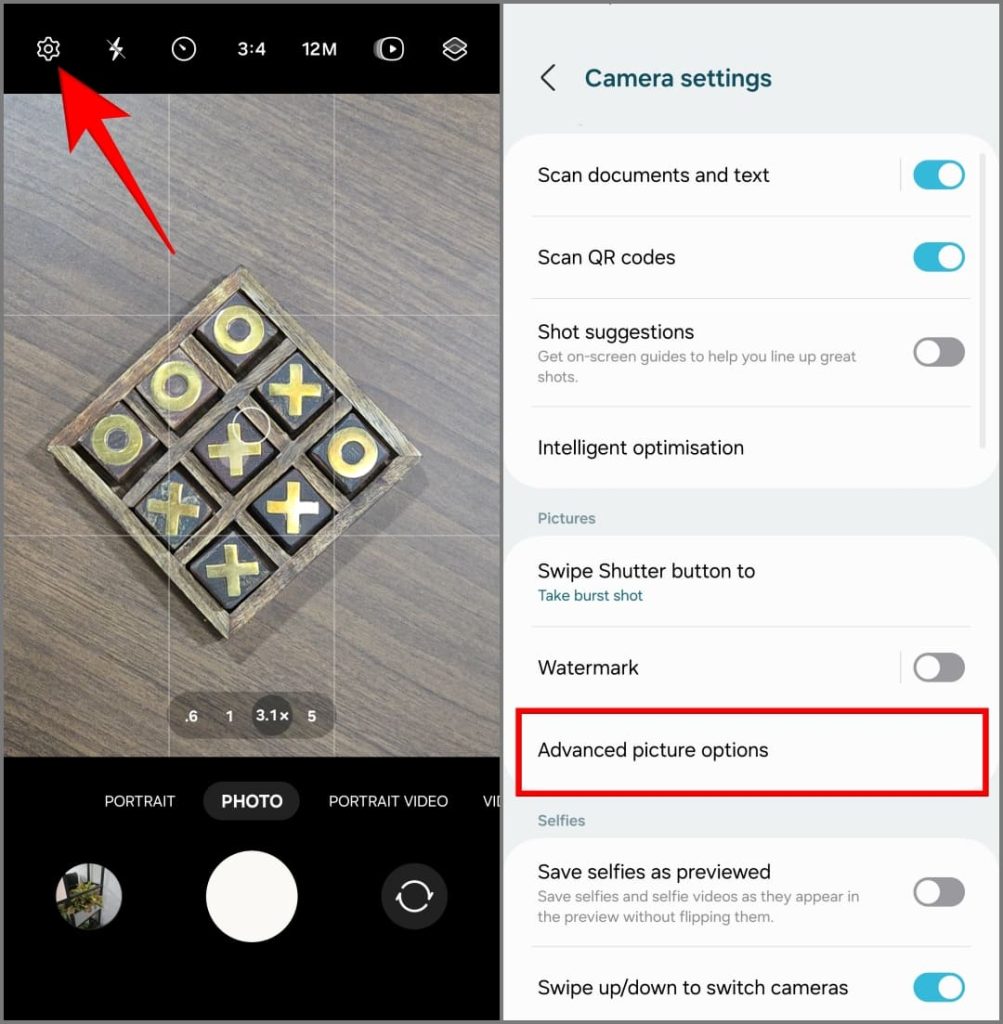
3. Here, toggle on High Efficiency Pictures.

4. Go back and tap on Advanced Video Options.
5. Choose HEVC (high efficiency) under Video format.
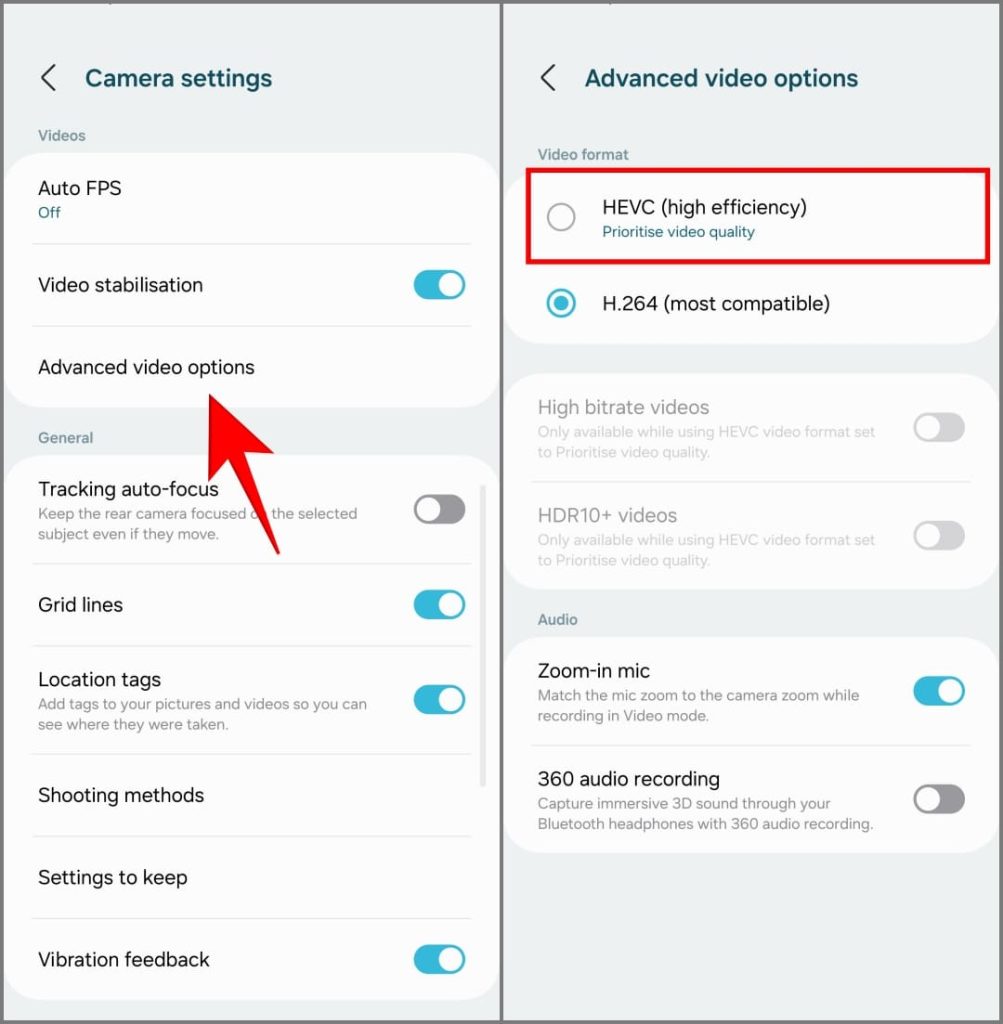
6. Select Prioritize video quality when prompted to ensure your videos still look great.
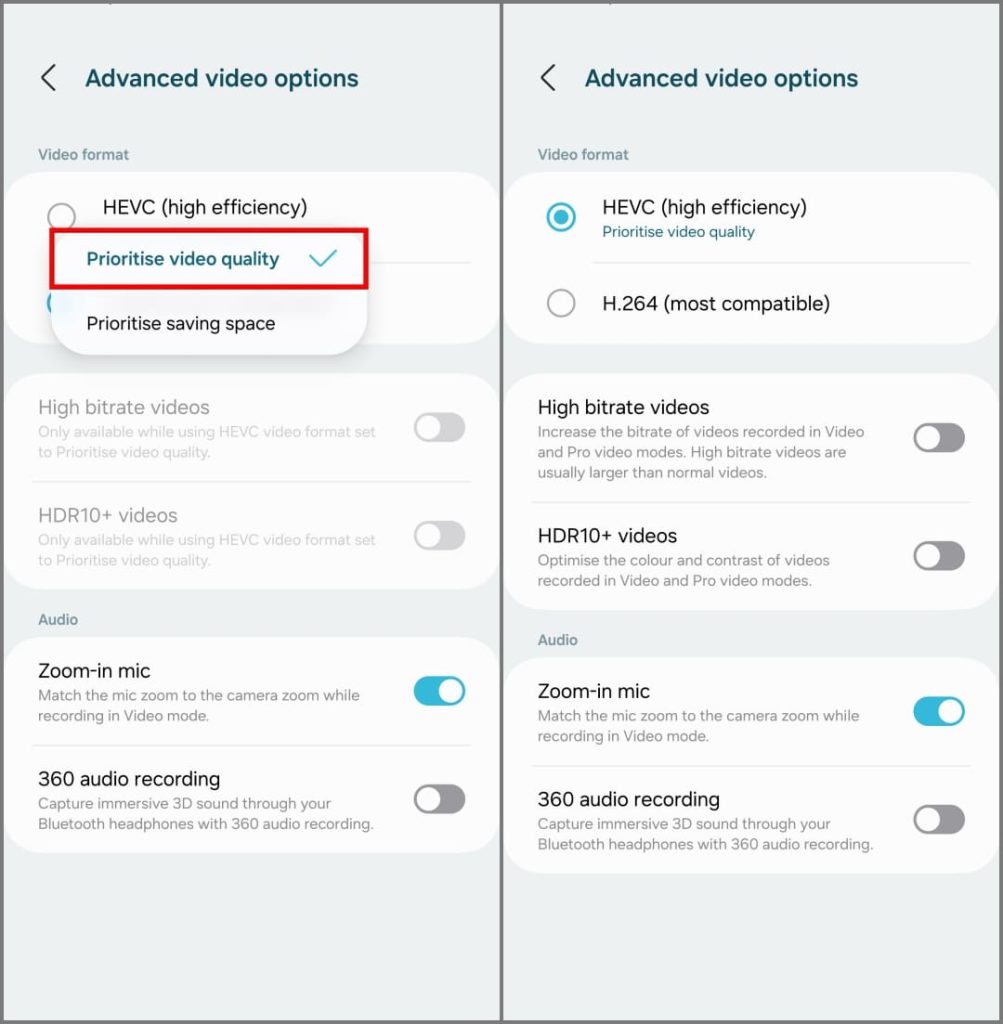
On Galaxy S24 Ultra, high-efficiency images occupy 50-70% less storage space than regular. Similarly, high-efficiency videos are 20-30% smaller than the more compatible H.264 format.
High-efficiency mode saves photos in HEIC format and videos in HEVC format. Some apps and websites may not support these formats. So you’ll need to convert images and videos for compatibility. Prefer using the more compatible formats if you plan on editing the photo or video later.
3. Use Dual Recording
Dual Recording on the Galaxy S24 Ultra replaces the Director’s View feature that debuted with the S21 series. It allows you to record videos using two different rear cameras simultaneously, such as the ultra-wide angle and telephoto lens at the same time, or even from the selfie camera alongside a rear-facing lens.
Capture your friend’s birthday party on the main camera while your live reaction appears in a smaller picture-in-picture window. Or narrate your entire trip in a selfie-vlog, showcasing amazing landscapes or architecture from the rear camera. Another use case could be at a concert where you can record both a zoomed-in view and an ultra-wide-angle shot together.
1. Open the Camera app and tap More in the toolbar at the bottom.
2. Tap on Dual Recording from the available options.
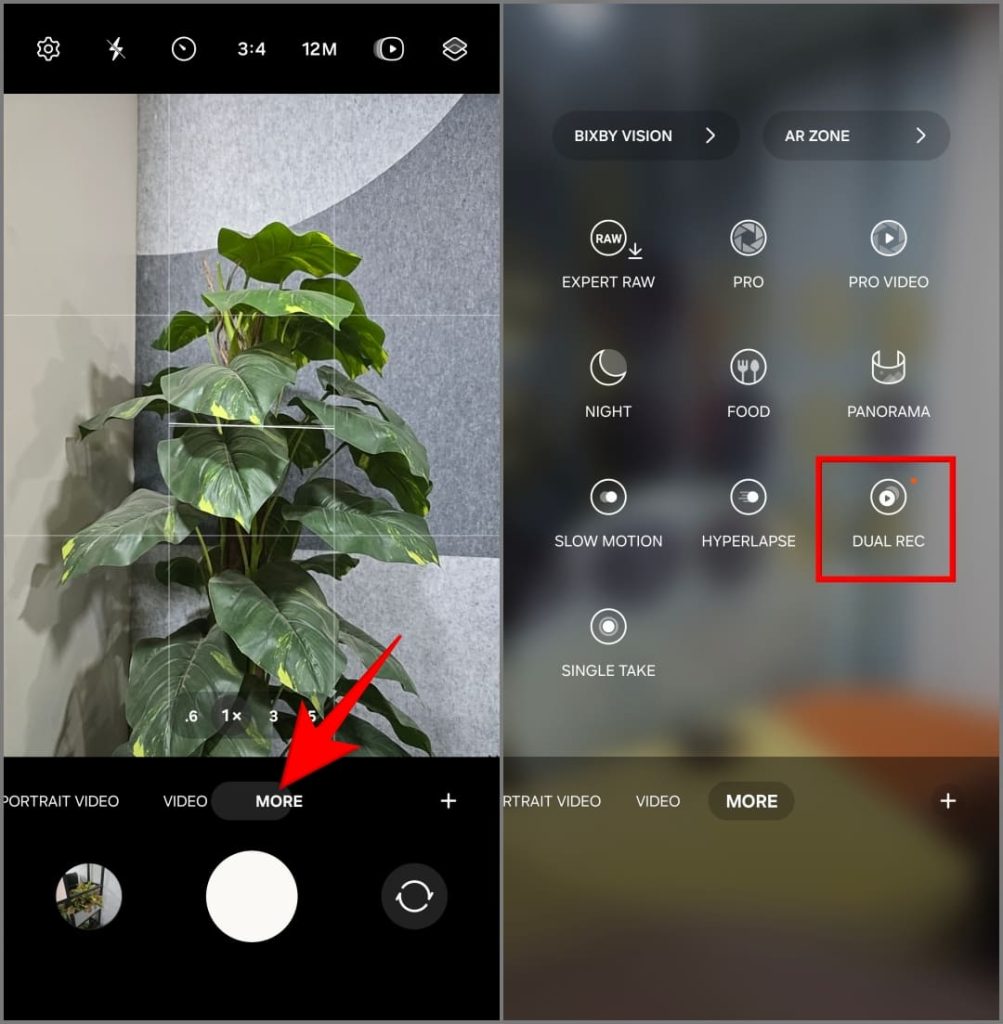
3. Tap Select Lenses and choose the two cameras you want to use simultaneously (e.g., ultra-wide-angle and telephoto), and tap OK. To swap their positions on screen (main vs. PiP), tap on either lens after your selection.
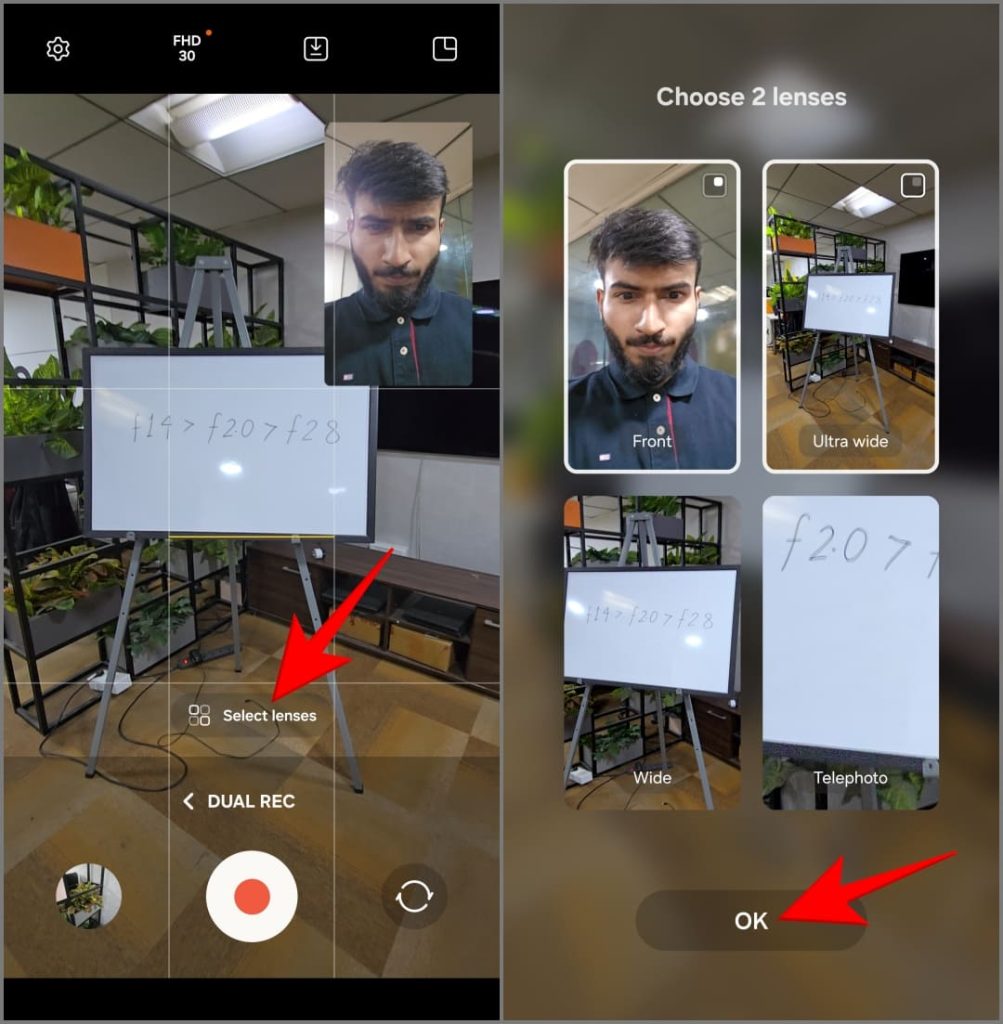
4. Tap the Save icon on the top to choose whether you want to:
- Save video as previewed: This combines the two camera views into a single video file in the layout you chose, i.e., picture-in-picture or split-screen.
- Save as two separate files: This will create two individual video files, one from each of the cameras you used while recording.
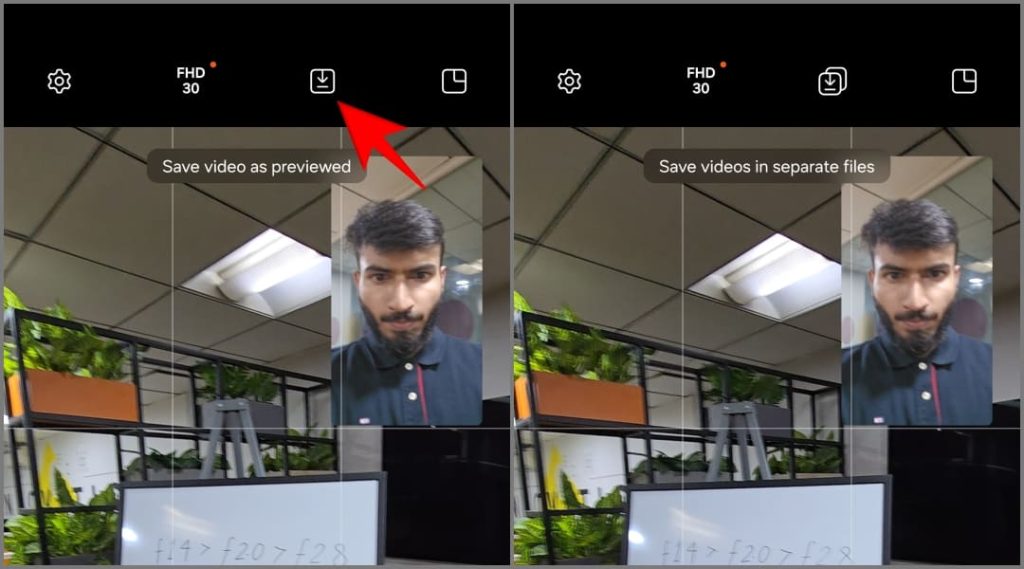
5. Next, tap the layout icon on the top right to choose your layout:
- Picture-in-Picture View: Your secondary camera will appear in a smaller box on top of the main video.
- Split View: Your screen will be divided in half, showcasing both camera feeds side-by-side.
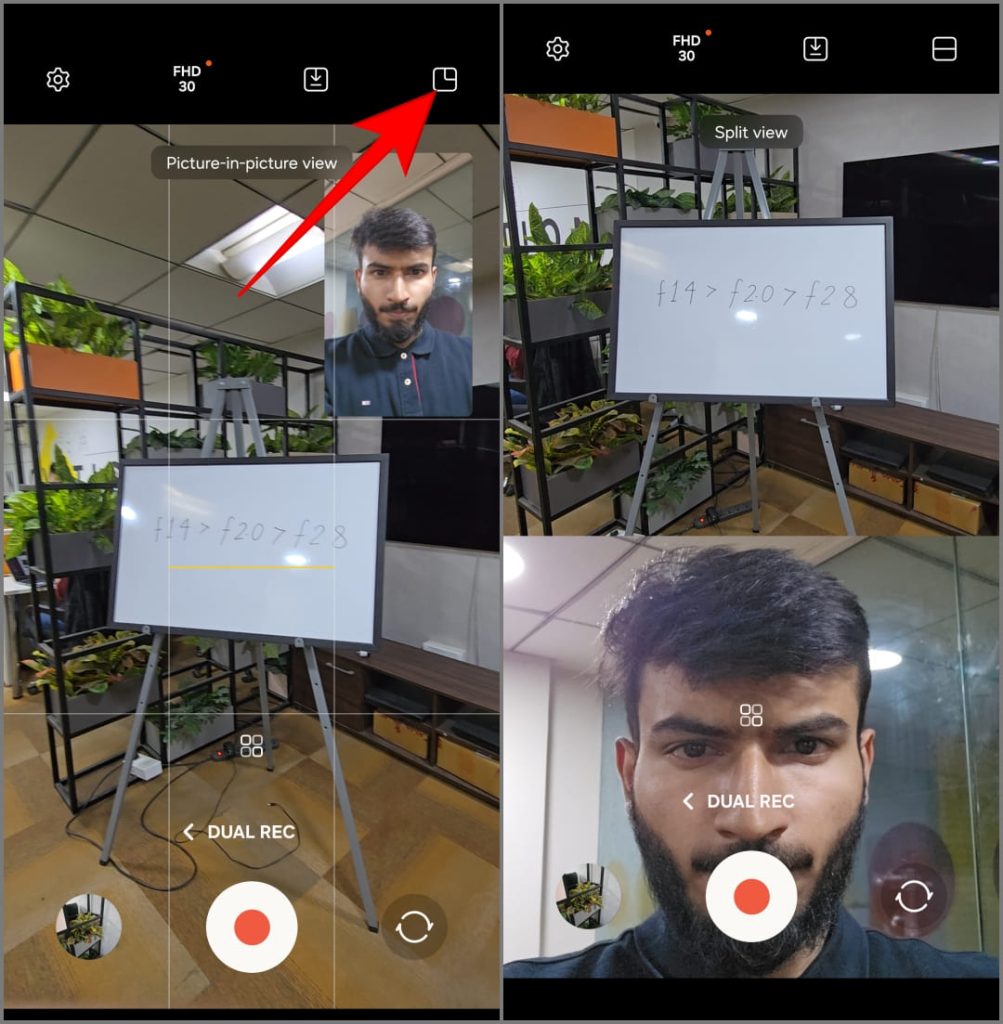
6. Finally, press the red record button to begin recording the video using both cameras simultaneously.
4. Use Single Take
Single Take is a unique camera feature that records a short video (approximately 10 seconds). It then uses AI to extract a variety of interesting photos and videos from the scene, applying different filters and modes tailored to the moment. You can then decide which ones to keep and which ones to reject.
Samsung introduced the Single Take feature with the Galaxy S20. For the Galaxy S24, they’ve upgraded the feature, allowing it to capture images and videos simultaneously using all cameras on the phone (including both front and rear-facing lenses). Here’s how to use it:
1. Open the Camera app and tap on More.
2. Choose Single Take.
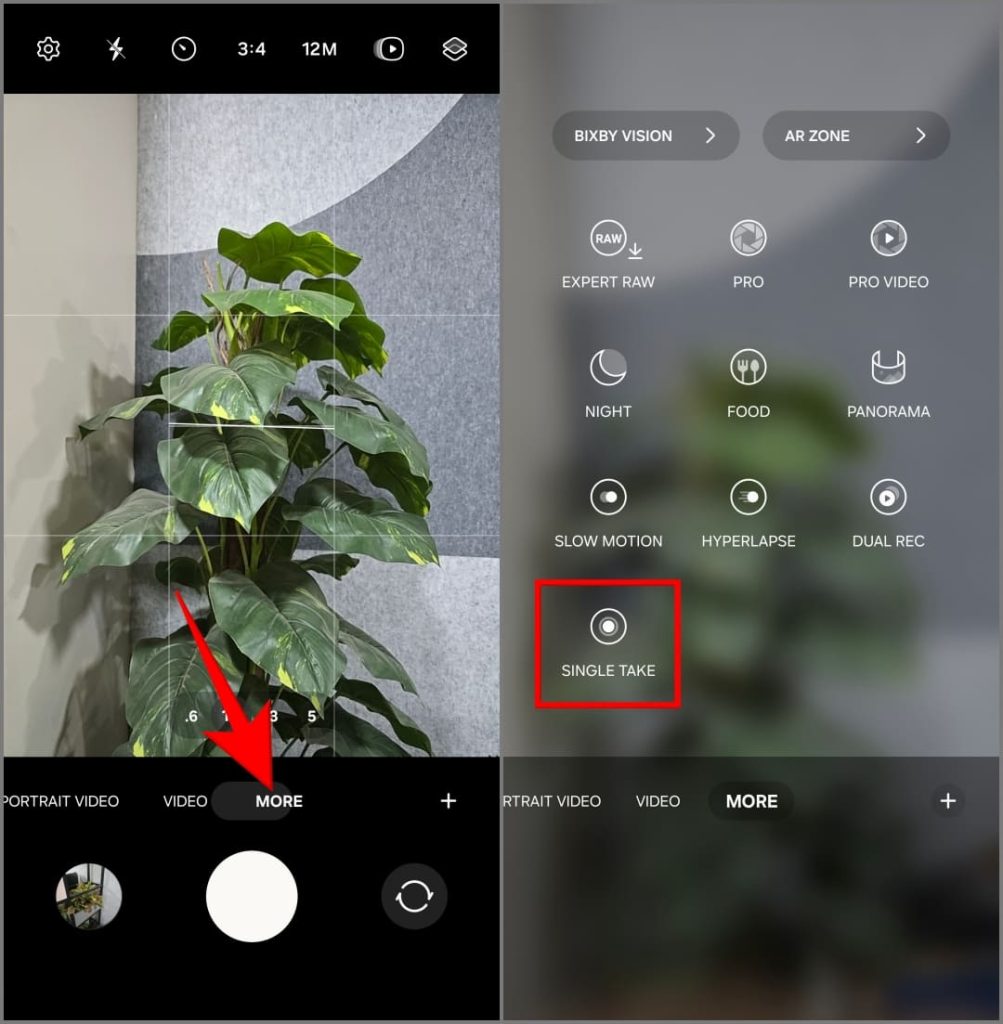
3. Choose between the 0.6x, 1x, 3x, 5x, or 10x zoom options. You can also shoot in 2x by adding the shortcut through Camera Assistant app (we’ll talk about later).
4. Tap the shutter button to record the 10-second video. You can make it 15 seconds by tapping the +5s button.
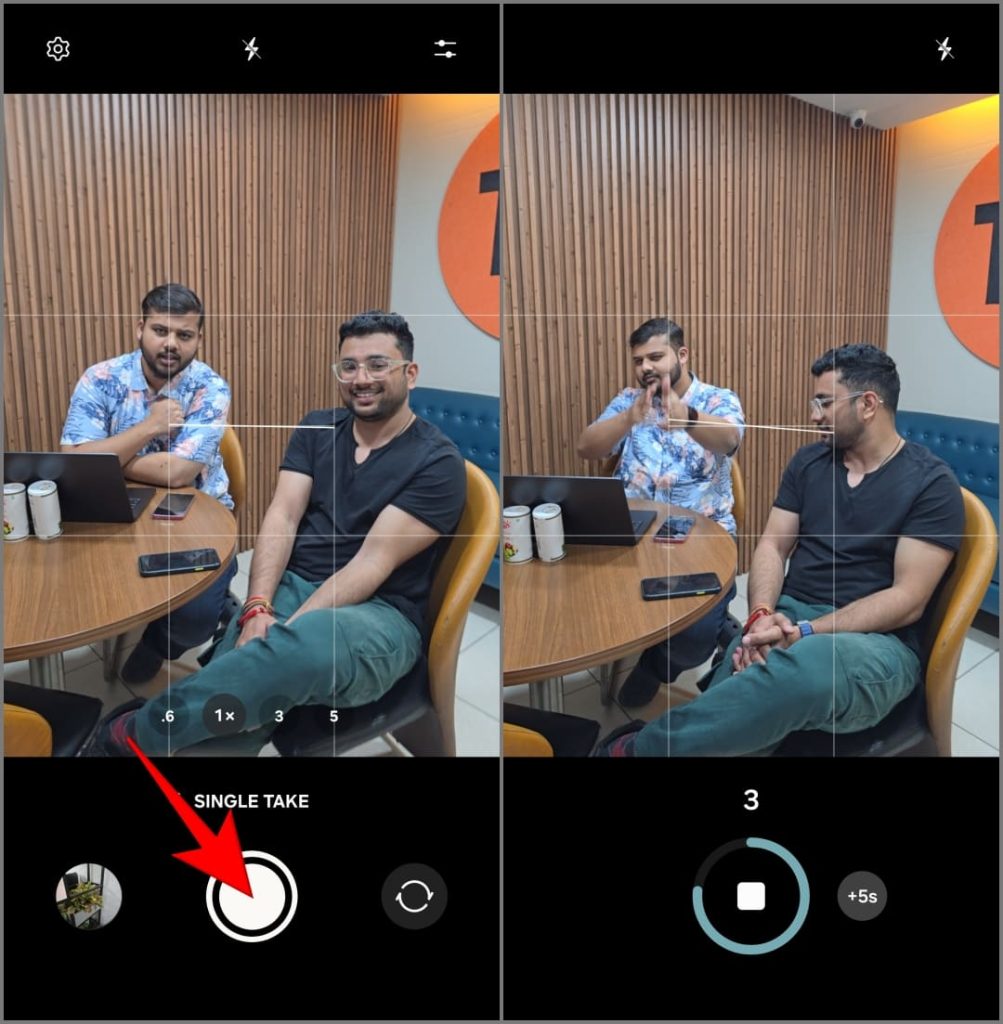
You will get a minimum of four results including the original video, a boomerang, the best photo, and a cropped shot. Choose the ones you like and delete the rest.

5. Adjust Intelligent Optimization in Photos
Your Galaxy S24 Ultra utilizes Artificial Intelligence to automatically improve your photos. It detects the scene or object you’re trying to capture and adjusts camera settings like color balance, saturation, brightness, contrast, and more accordingly.
While enabled by default, you can customize the intensity of AI optimization in your photos. Here’s how:
1. Open the Camera app and tap on Settings on the top left.
2. Tap on Intelligent optimization.
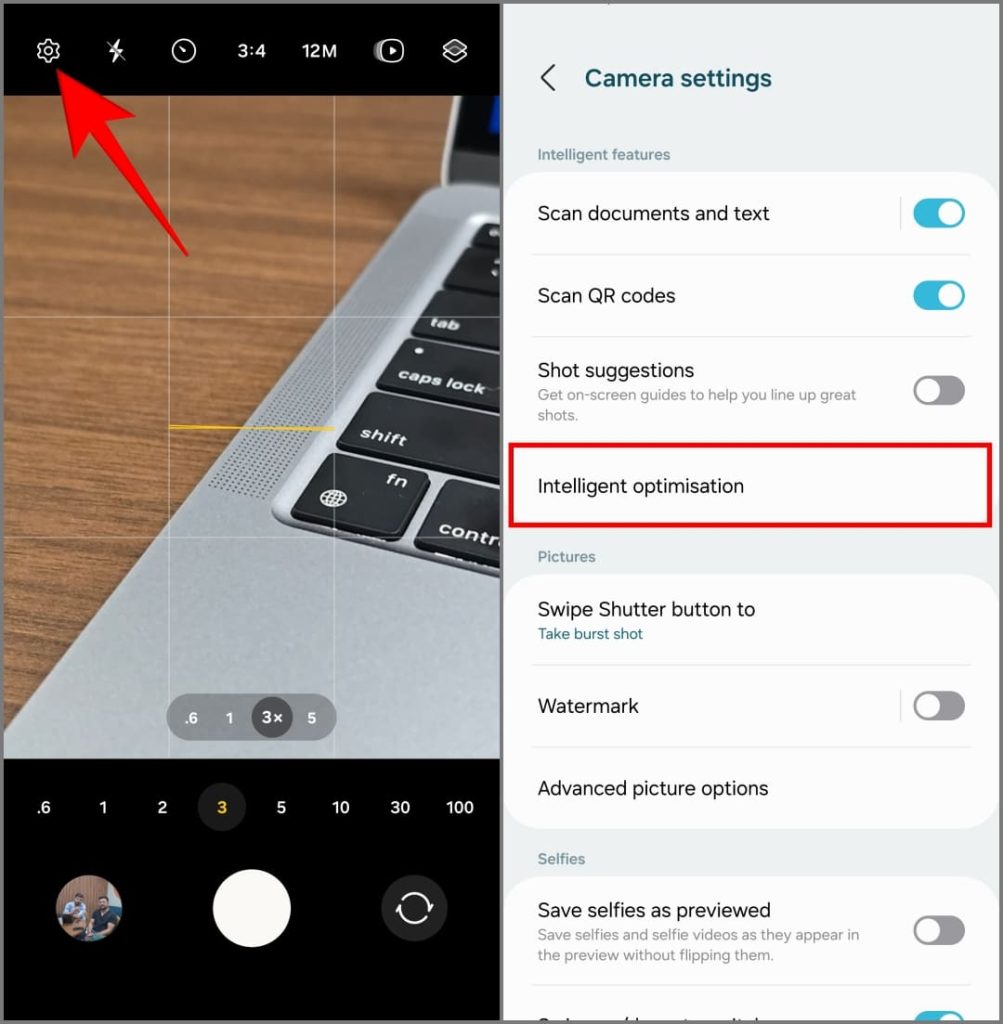
3. Choose your level of optimization:
- Maximum: Captures bold pictures that might sometimes appear unnaturally saturated, filtered, and over-processed. That being said, this setting is perfect for clicking social-media-ready photos.
- Medium: It offers a good balance between natural-looking shots and AI enhancements. I found it ideal for everyday point-and-shoot.
- Minimum: The AI will still analyze and post-process your photo, but the changes are more subtle and prioritize a natural look. Use this if you prefer editing photos yourself.

You’ll find another AI feature, Scene Optimizer, on the same screen. It detects objects in the frame and adjusts exposure, contrast, white balance, and more to tailor the photo to those objects. It recognizes over 32 things, including babies, dogs, cats, people, food, landscapes, beaches, sunsets, cities, and more.
Photography is a very personal hobby, so experiment and mix and match the available settings to find what best suits your style. I keep optimization set to medium with Scene Optimizer turned off.
6. Turn On Auto Framing to Keep Subject in Frame
Tired of trying to keep moving subjects in focus while filming? Try Auto Framing on your S24 Ultra. When recording a video, it detects people and automatically adjusts the framing to keep them centered and in focus.
To use it, open the Camera app and switch to Video mode. Tap the Auto Framing icon on the lower-right corner. It needs to turn yellow with a notification indicating that auto-framing has been turned on.
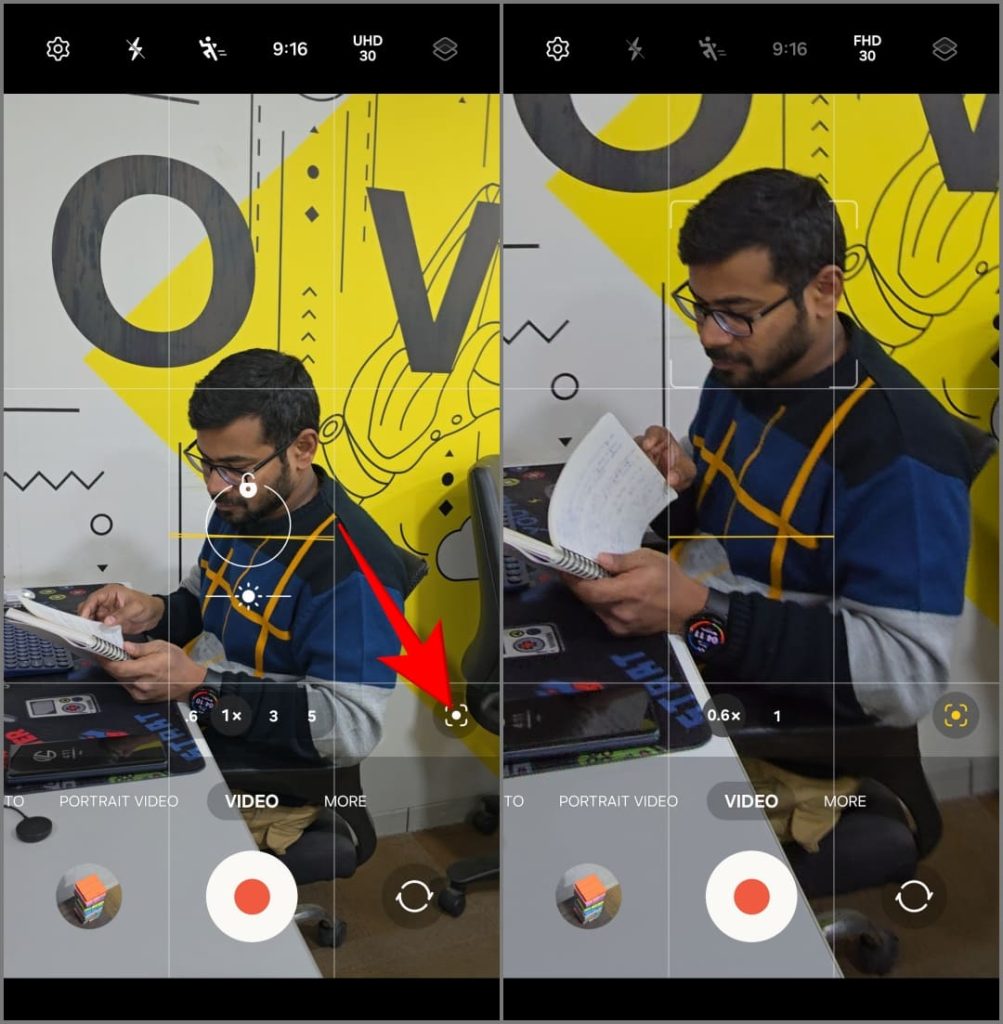
Start recording and tap the object or person you want to keep in focus. Your Galaxy S24 Ultra will automatically zoom in and out to keep them centered throughout the video. It pans smoothly to give you a jitter-free video, even if you aren’t actively moving the phone yourself.
Note: When you turn on Auto Framing, you’ll see 0.6x and 1x zoom options on your screen. We recommend using 0.6x, which uses the phone’s ultra-wide-angle camera and offers more space for cropping and panning to keep the subject in frame.
7. Use Focus Enhancer to Capture Macro Shots
Like many other flagship smartphones, the Galaxy S24 Ultra lacks a dedicated macro lens. Instead, it relies on its ultra-wide-angle camera for close-up shots. If you’re struggling to capture a macro shot or focus on a nearby subject, try using Focus Enhancer.
To do so, open the Camera app and bring the phone close to the subject. The Focus Enhancer icon should automatically appear in the lower-left corner– tap it, and it’ll use the ultra-wide lens to focus. You can now capture a detailed macro photo by staying close to the subject while keeping it sharp.

8. Instantly Turn a Video Into Slow Motion
When you record a traditional slow-motion video, your phone captures many frames per second and stretches them out during the playback. This creates a smooth, slowed-down effect when you watch the video. But with the Galaxy S24 Ultra, you don’t always need to plan to get this effect.
The S24 series has a unique feature called Instant Slow-Mo. Long-press on a recorded video in the Samsung Gallery app. The phone’s AI will analyze the frames and create new ones to slow down the footage artificially. The results look quite acceptable for an AI-powered effect.
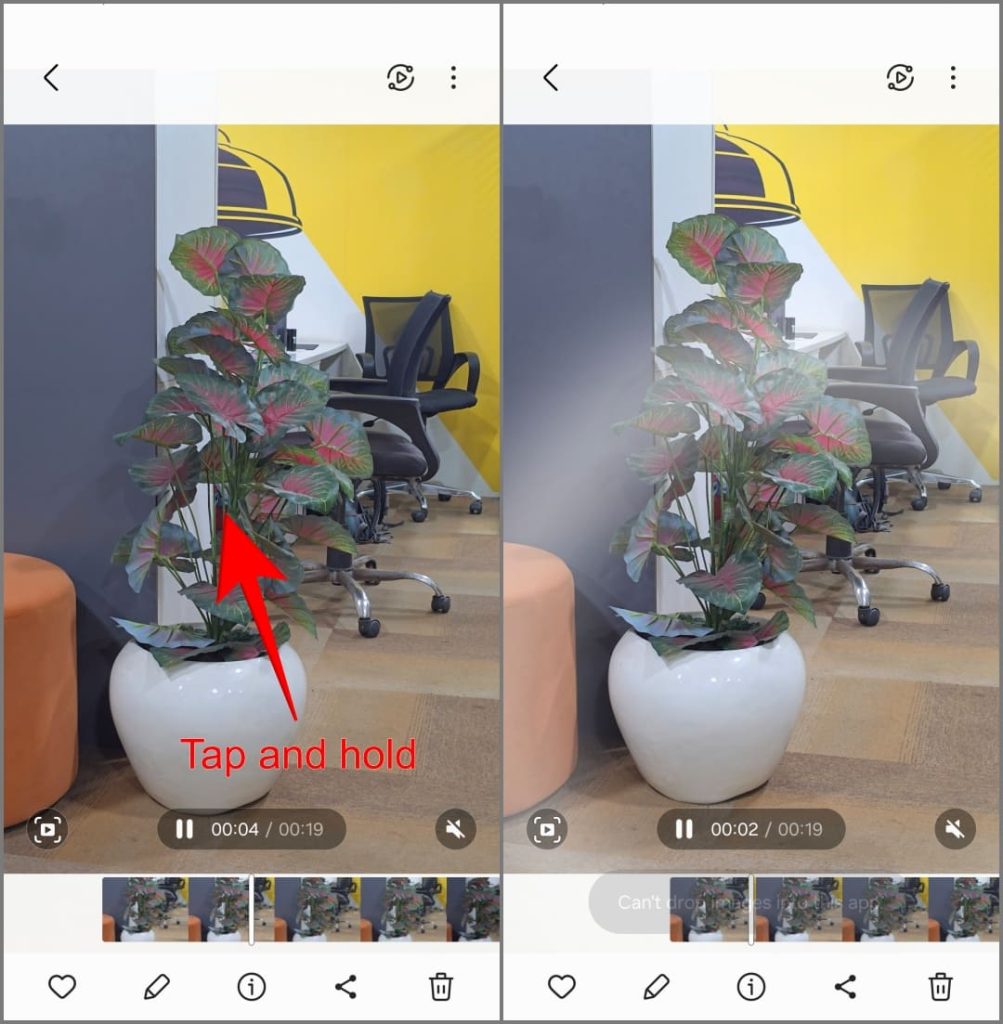
Instant Slow-Mo currently only supports 8-bit videos shot between 720p to 8K resolution and in the MP4 file format. Samsung might add support for 10-bit videos and the MOV format in the future.
9. Unlock Secret Camera Features on Galaxy S24 Ultra
Like other Samsung phones, the Galaxy S24 Ultra supports Camera Assistant, a Good Lock module packed with helpful tips and tricks to enhance your camera features.
To get started, download Camera Assistant from the Galaxy Store or the Good Lock app. Then, access it via Camera Settings > Camera Assistant or directly from your app drawer.

Here are the additional camera options you get to play with:
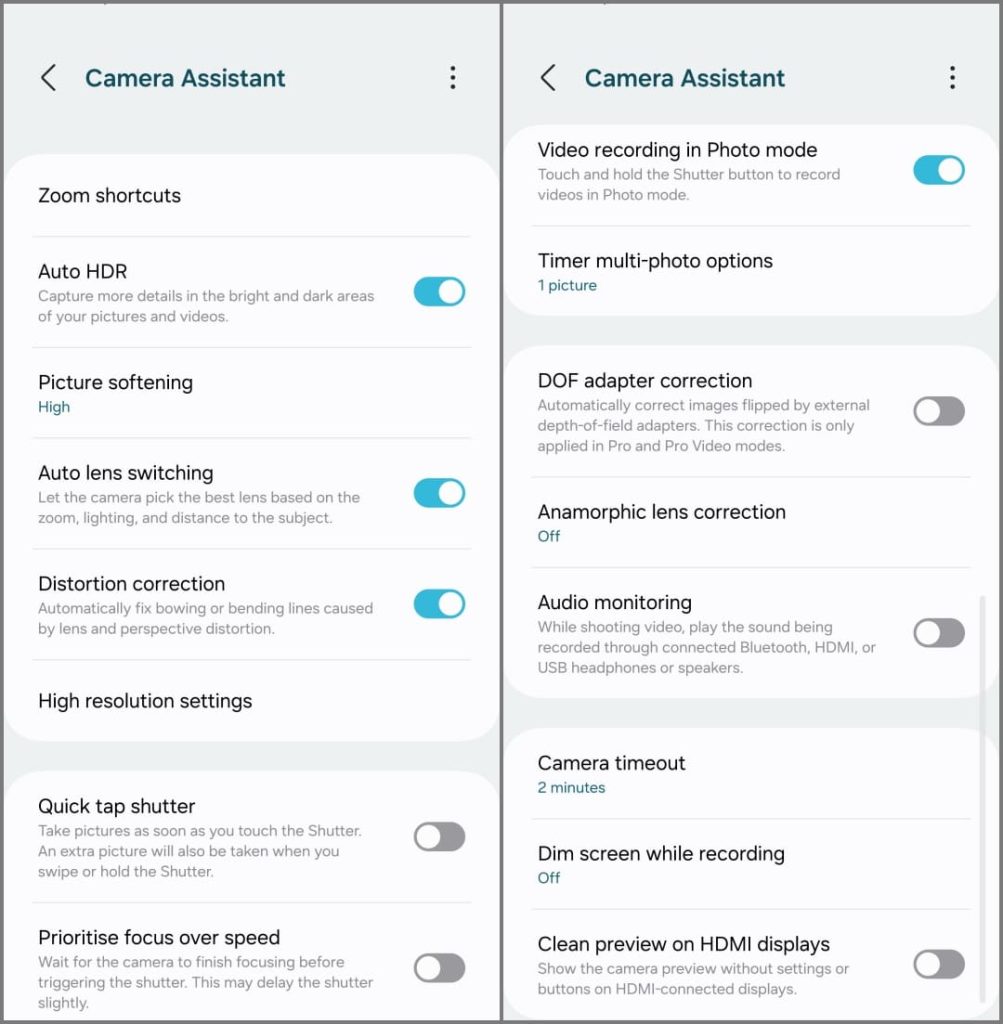
- Zoom shortcuts: Adds extra zoom options (2x, 10x, and 100x) to your Camera app.
- Auto HDR: This will help you capture more details in extremely bright and dark areas of photos and videos you capture.
- Picture Softening: It smoothens out sharp edges and features in a photo, fixing over-sharpening issues, if any. Choose between Off, Medium, and High settings; Medium is a good starting point for most users.
- Auto lens switching: Enabled by default, this feature allows your Galaxy S24 Ultra to automatically switch lenses based on zoom level, lighting, and object distance. For example, it might switch between the primary and telephoto lenses in different lighting conditions. Turn it off if you want full control over lens selection.
- Distortion correction: It intends to fix bowing or bending limes caused by lens and perspective distortion. This helps in ultra-wide-angle shots where straight lines tend to curve outwards, especially on the edges.
- High-resolution settings: These settings offer two features- Adaptive Pixel and Upscale Digital Zoom. Adaptive Pixel improves low-light photos by combining multiple lower-resolution frames into a single, higher-resolution image. Upscale Digital Zoom, on the other hand, enhances the quality of zoomed-in photos by increasing their resolution to match the selected camera settings.
- Quick tap shutter: Normally, your phone captures a photo when you press and release the shutter button. The quick tap shutter feature captures the photo when you touch the Shutter button. This reduces shutter lag and helps you capture moments quickly.
- Prioritize focus over speed: When enabled, your Galaxy S24 Ultra will take a fraction of a second longer to ensure perfect focus before capturing the image. This reduces the risk of blurry photos but may add a slight shutter delay.
- Video recording in Photo mode: Touch and hold the Shutter button to record videos in Photo mode.
- Timer multi-photo options: Normally, when you set a timer on your camera, it takes a single photo after the countdown ends. This setting allows you to capture a series of shots in set intervals after the timer ends (for example, click 3 photos every 1.5 seconds once triggered). Use it when capturing group photos or creative bursts.
- Audio Monitoring: Connected Bluetooth, HDMI, or USB headphones/speakers play the audio while recording a video, allowing you to monitor the sound in real-time.
- Dim screen while recording: When recording video, you can choose how long before the screen dims- 1, 2, 5, or 10 minutes. This helps save battery when recording long videos.
- Clean preview on HDMI Displays: When you connect your camera or phone to an external monitor through HDMI, the display often includes on-screen overlays such as battery level, recording timecode, and focus indicators. The option will send a clean video feed to your external display or monitor, eliminating these distractions.
10. Use S-Pen Features in Camera

The S-Pen bundled with your Samsung Galaxy S24 Ultra packs some interesting features. You can launch camera, click pictures, switch between different modes, and use air gestures and the button onboard.
To view Air Actions for Camera, open the Settings app > Advanced Features > S Pen and select Air Actions > Camera. Or open Camera app and tap the S Pen icon to see the list of pre-defined air gestures, also mentioned below:

- Single Press: Take a picture or record video
- Double Press: Switch Cameras
- Press the button and flick up or down: Switch Cameras
- Press the button and flick left or right: Next or Previous mode
- Press the button and make a clockwise circle: Zoom in
- Press the button and make an anti-clockwise circle: Zoom out
Also Read: 13 Best Samsung Camera Settings to Use It Like a Pro.
Master These Galaxy S24 Ultra Camera Tips and Tricks!
These camera tips and tricks can help you enhance and improve your Samsung Galaxy S24 Ultra camera performance. My favorites include Single Take, Dual Recording, and Auto Framing. Then there’s a slew of other AI features, including photo remastering and Generative Edit, which uses artificial intelligence to remove objects and fill in empty areas. Overall, there’s a lot you can do with the Galaxy S24 Ultra’s cameras, and it’s only going to get better with updates.
[ad_2]
Source link
