[ad_1]
In the Surface event, Microsoft introduced a background removal tool for the Paint and Paint 3D app. However, they have now taken it a step further by allowing users to remove the background and make it transparent directly within the Photos app. This means you no longer have to open a separate app just to edit a photo you were viewing. Here’s how to remove background and make it transparent using Windows Photos app.
Change Image Background to Transparent in Photos
Now that this feature is available in the native Photos app on Windows, removing the background from any image is a piece of cake. Check out the steps below to see how it’s done.
1. First open the image you want to edit in the Photos app. If the image is not opening in the Photos app, right-click on the image, then on Open with and select Photos.

2. Now that the image is opened in the Photos app, click on the Edit image icon (Ctrl + E).

3. Here, just click on the Background Blur icon from the list of tools at the top, and from there, you can choose to Blur, Remove, or Replace the background.

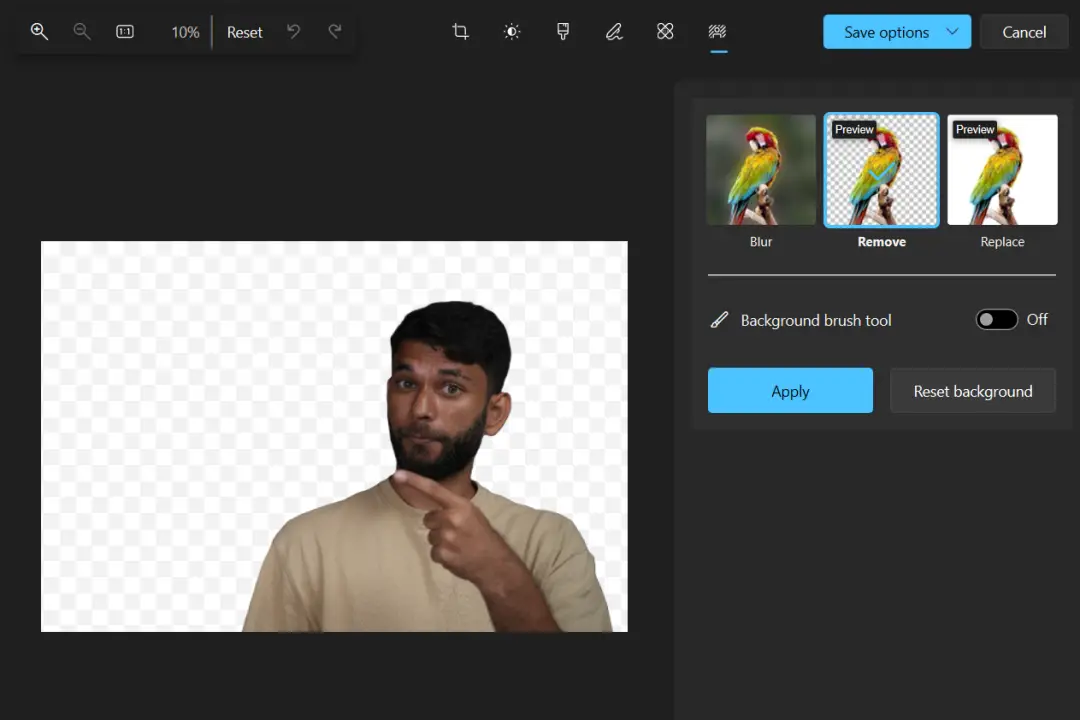
4. Now, click on Remove to remove the background of your selected image. It will take a few seconds to process.

5. As you may see the background of our image is removed pretty nicely. If the background removal is not accurate for your image, you can enable the toggle next to the Background brush tool and select Add or Subtract to add or remove the transparency respectively.
Just adjust the Brush size and softness according to your need and edit the image with the cursor.

6. Once you find that the background is removed perfectly, click on Apply to apply this edit.

7. Now to save the image without background, first click on Save options and then on Save or Save as copy. We saved the image as a copy to keep both the original image and the edited image. You can also select Copy to clipboard and paste the image where you want to use it.

8. After clicking on Save as copy choose the location where you want to save your image and then click the Save button. By default, the format is PNG but you can change that.

Pro Tip: Did you know that you can easily remove the background from your images on Android and iPhone too?
Add or Adjust Background Blur of Image in Photos
You can not only remove the background but also add or adjust blur to your photos, creating a shallow depth of effect. Here’s how.
1. After opening the image in the Photos app, go to Edit button > Background blur as explained in the previous method and select Blur.

2. You can adjust the blur effect by sliding the level below Blur intensity. And just like background transparency, you can edit the blur after enabling the toggle next to the Background brush tool.

Note: You can save the image by following the steps mentioned in the previous method.
Replace Background of Image in Photos
The Replace feature in the Photos app allows you to swap out the background of your image, though currently only with a solid color. This is a useful tool for editing professional-looking photos from the comfort of your own home, without requiring a plain background.
1. Open the image and go to Edit button > Background blur as explained in the previous method. After that select Replace. Here you can select any colour for the background of your image.

2. Below the option to pick the color, you can enable the toggle next to the Background brush tool and fix the background in case of unsatisfactory results.

Note: You can save the image by following the steps mentioned in the previous method.
Pro Tip: Do you know, that with a simple prompt, you can create some of the most astonishing AI image art in the Paint app?
Quick Edits
You can now avoid using free background remover tools that tend to add watermarks and lower the image resolution. With this integration in the Photos app, you can do so much more without relying on any other app.
[ad_2]
Source link
